Sunday, February 23, 2014

Candy Cane Purse Pattern

Candy Cane Sparkle Delight Purse Pattern to Buy


The Candy Cane Sparkle Delight Purse crochet pattern is from "The City Girl" PBD collection series. It is a cute wrist bag pattern. Easy to follow directions. A knit or crochet added flower. It's wonderful to use for any occasion. Lots of "bling" and sparkle. The bag has an inside pocket for your smaller essentials and has lots of "eye candy" appeal. Can be made in any color. The pattern is not difficult, however finishing and adding the some details may be more for the "intermediate" crocheter. This bag was made with #10 Crochet Sheen yarn and Metallic Eyelash Flutter yarn. 
Get your pattern today
Pattern Only: $8.00
To buy the finished bag shown in the photo go HERE 


Add caption


Thursday, March 28, 2013

Crochet Windsock


Something I made a couple years back to add to my patio... the wind sock is made from an ice tea can or you can use an oatmeal box too....

Here is what you will need:
Crocheted Windsock
  • one small round can [oatmeal or ice tea]
  • yarn 4ply WW any color [I used a tan]
  • some felt of colors you will use to make your designs [I made a house and birds and used blue,red,dark green, brown, yellow,blue, tan, black
  • button flowers
  • pre-cut flowers
  • buttons for embellishments
  • alpha beads
  • ribbon
  • glue
  • plastic tablecloth cut in 2" strips to the length you wish it to be [I made mine 5' long

  1. Clean out your can and leave empty
  2. **crochet a round see directions below
  3. cut tablecloth into long strips 2" wide x 5' long
  4. glue on precute felt flowers [JoAnns or any craft store]
  5. cut out your bird and bird house from the felt and then glue onto can
  6. cut out a tree from the brown and green felt and glue on can as shown in picture
  7. glue on the buttons onto the tree to make your design
  8. cut out bird house with red and beige felt and glue on other side of tree[see photo for pieces to cut] I made a round hole with black felt and cut a few yellow squiggly pieces to glue on the foof area, you can make it any way you want, personalize it and add a name on the other side, gluing alpha beads on a ribbon
  9. attach cut plastic to bottom of can by tieing a knot in every 2 stitch,
  10. cut strips to desired length


  11. See how it moves when the wind hits it. This is an easy project and one that is fun and can be embellished any way you like. Try your artist abilities and make yours and be sure to post and link to your designs so I can see what you came up with!
**Crocheted windsockpattern:
  • crochet a round with color of your choice, ch 4, ss to join, ch 1, 12 sc in circle, ss to join in 1st sc, ch 1, do not turn
  • 2 sc in each sc around, ss to join , ch 1
  • sc in same st, [2 sc in next st, sc in next st] repeat around, ch 1
  • sc in same st, [sc next 2 st, 2 sc in next st]rpt around, ch 1
  • sc in same st,[sc next 3 st, 2 sc in next st] rpt around, ch 1
  • rpt around till fits top of can top you have used adding 1 more sc and then 2 sc
  • next row sc around in back loops only around, ch 1
  • sc in both loops around ss to join, ch 1
  • rpt around till you reach the bottom of your can
  • then sc in back loops only around ss st to join, ch 1
  • sc dec in 1st 2 sts, sc around leave last 2 st then sc dec in last 2 st, ss to join, ch 1
  • rpt last row around and then ss dec last 4 sts, fasten off
  • at top of can attach with ss to any top sc st, ch 10, fasten off
  • do this 3 more times spacing according to photo
  • attach yarn to ring and sc around, 12-15x, fasten off
  • attach 4 ch to loop with a ss joined in the middle, see photo


Note: This patterns is exclusive of PBDesigns Patterns. If you make these "Crochet Windsock" be sure to send me your link and link back to this pattern/blog. I love to see photos too. This pattern is copyrighted it can be made for personal use or charity use, or to sell, as long as you give credit to this blog and "PBDesigns". If you want to post photos of these "Crochet Windsock" on your blog or URL, then refer back here with a link for the pattern. Do not post the pattern or copy and distribute to others, or sell it, you are welcome to link back here and print it out for your own personal use.  
 © 2009 PBDesigns
 Thank you. PBDesigns

Friday, October 12, 2012

Halloween Fun Patterns


have been working on my upcoming Halloween party which is themed Remember the "1970s when there were beads hanging in doorways of a lot of homes? I decided to made beads for my doorway one day before Halloween. At first I was trying to figure out what I could hang up and then got the idea to use those "Mardi-gras" beads that you can purchase at the $1 store as necklaces,  I had been using them to make beaded garland, and they did the trick. [no pun intended] I think it worked out great!!! What do you think? Here's a pattern for you to try for yourself.


Full length view

Top of curtain

Close up

                                Spooky Halloween Door Beads

You will need:
  • 3 beaded necklaces for each strand hanging [48 necklaces-be sure they are the same length-needed for 16 hanging beaded strands]gold, silver and purple]
  • 4ply worsted weight yarn[I used Red Heart] Orange, Black, Purple, and White
  • wooden dowel 3/4"[JoAnns Craft store]
  • 2 wooden ball ends to slip over dowel
  • Aleena's Tacky glue
  • DecoArt Twinkles Black craft glitter paint
  • Hook size G or F
Start by cutting a necklace anywhere between two beads-
ch 8 1st Step: with one end of beads -begin to attach with a sc between the first and second bead- 2x, continue to sc between each bead to the other end, Next Step: -change colors-cut the 2nd necklace and start with sc 2x between the 1st and 2nd bead of the 2nd beaded strand, Next Step: repeat on the 3rd strand -changing colors again-
HINT: the tighter you crochet the more of a "curl" you will have-
Ending: You will end with a ch 4-5 and fasten off.

You can make any color combination or make each strand all one color- Make 16 strands and weave in ends

HINT:  when adding a new necklace strand sc around the tail of the new color to help shorten the weaving in process-

I used the black orange black on most strands-or purple- white -purple, or purple-black-purple-- mostly I tried to use Halloween colors. :)

Next Step: I wraped the end of each bead strand with the 8 ch- around the dowel and knotted in place       -I used black-  sc around the dowel spacing each strand evenly to hold in place. -this keeps each strand from moving- NOTE: Be sure to leave abour 2 " at each end. Next Step: Put some glue inside each end ball opening and slip over both ends of the dowel.

Let dry over night

Last Step: paint the balls with the black paint. Let dry ....

Hang up in any doorway or window area, these can be used at any party in any color or for any holiday, Experiment and have Fun.  Think of a birthday or Christmas in Red, Green, & Gold or Silver. Or what about Green for St Patrick's Day, or how about a party with a "beach " theme, make it with shells in blue and white, or red, white, & blue for the 4th of July. The possibilities are endless.
Be sure to show me what you have made and link back to this blog for pattern details and giving credit to me for the pattern. Thank you....

"HappHalloween"


Note: This patterns is exclusive of PBDesigns Patterns. If you make these "Doorway Beads" be sure to send me your link and link back to this pattern/blog. I love to see photos too. This pattern is copyrighted it can be made for personal use or charity use, or to sell, as long as you give credit to this blog and "PBDesigns". If you want to post photos of these "Doorway Beads" on your blog or URL, then refer back here with a link for the pattern. Do not post the pattern or copy and distribute to others, or sell it, you are welcome to link back here and print it out for your own personal use.  
 © 2012 PBDesigns
 Thank you. PBDesigns

Tuesday, April 24, 2012

I've Been Published!!!


One of my Patterns has been published in an EBook over at AllFreeCrafts ....see it here and enjoy some patterns by lots of "crafters" 

Get your FREE EBook Today!

There are a ton of "Christmas" crafts for you to make. I know it's early but then again it is never too early to start making crafts for the holidays!
Enjoy!!!

Tuesday, January 31, 2012

The "I Love Pigs" Necklace FREE Pattern

Do you love pigs? 
Then this necklace is for you! 
I made this the other night for my 
BFF who loves pigs. 
It was fun and I thought I would 
share it with you too. 
If you love it and 
don't want to make it yourself 
it is 
available in my Etsy shop!


Free Pattern                  "I love Pigs"Necklace

Here's a free pattern for you:


  "I Love Pigs" Necklace

What you will need:
  • size G crochet hook
  • matching thread to sew on beads & chain
  • darning needle 
   Size:  Pendant = 3" diameter,  chain = 14" hang length

 Abbreviations:

 chain stitch ..................ch st
 single crochet................sc
 double crochet...............dc
 slip stitch......................sl st
 fasten off.......................FO
 main color.....................MC
 coordinating color..........CC


 How tos:

  1. Working with "MC" yarn, chain 4, join with a sl st in first ch st ,              DO NOT TURN
  2. ch 1 sc in same st, 2 sc in each st around, join [add 1 more row if            you want the pendant larger or you crochet tight]
  3. ch 3, dc in same st, *[dc in next st, 2 dc in next st], repeat from [*] around, join  in top of 1st ch 3 st
  4. attach "CC" yarn ch 1, sc in same st and 2 sc in each st around,            join in 1st sc, FO, 
  5. weave in all ends with darning needle
  6. sew pig button in the middle pushing shaft of button back through       small opening in middle with matching thread
  7. sew the 2 beads above the piggy with thread
  1. measure the chain to the length you wish your pendant to hang,
  2. using jewelry pliers separate one chain link at the length you have chosen,[I used 28"] remove excess chain
  3. attach chain [laying one link flat] with matching thread on each side on the back of the [MC] spacing it approximately 2" apart[see photos]
  4. cut a circle from felt approximately 2 1/2" in diameter or the size of your pendant, be sure it covers your chain link, do not cover the [CC] trim 
  5. glue in place and let set 24 hours   

Enjoy!


If you make this "I Love Pigs" necklace be sure to send me your link and link back to this pattern/blog. I love to see photos too. This pattern is copyrighted it can be made for personal use or charity use, or to sell, as long as you give credit to this blog and "PBDesigns". If you want to post this necklace on your blog or URL, then refer back here with a link for the pattern. Do not post the pattern or copy and distribute to others, or sell it, you are welcome to link back here and print it out for your own personal use.  
 © 2010 PBDesigns

Wednesday, August 31, 2011

"Shell Knot Necklace" Free Pattern


 This is a pretty and easy necklace to make:

Materials:
  • 2 6' ribbon yarn [or any shoelace wide yarn or thread]
  • 1 shell [can get at any shell shop or online]
  • 3 clear pony beads [blue-pink-green]
Directions:

  1. fold yarn in half
  2. at folder end tie a knot 1" from end
  3. measure down 3-4" and knot again
  4. there will be 3 knots
  5. then knot again under 3rd knot
  6. and again under the 4th knot
  7. thread shell up to knot tightly
  8. knot on the other side 3x
  9. then measure up to equal other side and knot up
  10. once you are at the end knot and then string on one of the pony beads
  11. knot and string on the other pony bead
  12. knot and string on the last pony bead
  13. knot after last bead
  14. trim the ends to be even, they will just hang
The necklace closes with pulling the loop over the beads till desired length and the ends hang down your back.


Note: This patterns is exclusive of PBDesigns Patterns. If you make these "Shell Knot Necklace" be sure to send me your link and link back to this pattern/blog. I love to see photos too. This pattern is copyrighted it can be made for personal use or charity use, or to sell, as long as you give credit to this blog and "PBDesigns". If you want to post photos of these "Shell Knot Necklace" on your blog or URL, then refer back here with a link for the pattern. Do not post the pattern or copy and distribute to others, or sell it, you are welcome to link back here and print it out for your own personal use.  
 © 2011 PBDesigns
 Thank you. PBDesigns


Tuesday, August 23, 2011

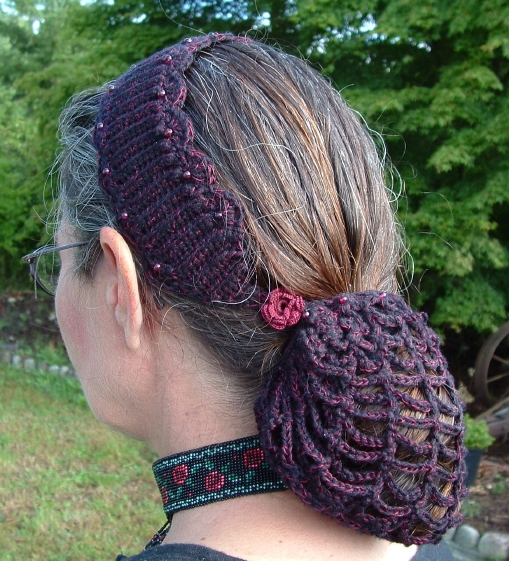
Snood--

                        
This "Snood" is not my pattern but it is an original free design from Kathryn A White  do chek out her site,"CrochetnBeads" as she has several cute designs. I love Snoods and thought my followers might enjoy one with a little different twist adding a beaded headband.

---------------------------------------------


Friday, May 6, 2011

Allie Cat Bag/Purse Pattern to Buy

Allie Cat Bag/Purse Pattern Only

Allie Cat Bag/Purse
Crochet Pattern
The Allie Cat Bag/Purse crochet pattern is the cutest bag ever! You can make it for a little girl or a big girl! The bag is very roomy and has lots of "eye candy" appeal. The pattern is nit difficult, however finishing and adding the face details may be more for the "intermediate" crocheter. This bag was made with Home Spun yarn and Eye Lash Fun Fur. It has a long shoulder strap. 
This is a cute bag get your pattern today
Pattern Only: $8.00


close up of strap


Note: This patterns is exclusive of PBDesigns Patterns. If you make these "Allie Cat Bag" be sure to send me your link and link back to this pattern/blog. I love to see photos too. This pattern is copyrighted it can be made for personal use or charity use only. If you want to post photos of this "Allie Cat Bag" on your blog or URL, then refer back here with a link for the pattern. Do not post the pattern or copy and distribute to others, or sell it.  
 © 2006 PBDesigns
 Thank you. PBDesigns

Monday, January 31, 2011

Monday, January 24, 2011

Swimming with the Dolphin Necklace

Its so easy to make, here is the free pattern...


Materials:
Dolphin glass pendant [Blue Moon, I got mine at Michael's Craft Store]
Anne Blatt [small amount it is from their Glamorous collection 3 colors with gold]
1 Lobster Claw Clasp 
4 oval jump rings 2 large and 2 medium
Bent Nose pliers
Chain Nose Pliers
size F crochet hook or one to create a tight ch st

Directions:
Leaving a 6" tail slip knot onto hook and ch 1adding your 1st jump ring by putting hook through jump ring pull loop through and finish your ch st, continue with ch st until desired length, then ch last st onto 2 jump ring the same way as you did the 1st jump ring. Attach the closure you have chosen to one end [depending on weather you are right or left handed, right handed put it on the right end and left handed people on the left end] of your ch cord by opening up the jump ring and sliding the end of the lobster claw onto the ring and closing the jump ring , attach 3rd jump ring in the glass loop on Dolphin and then add 4th jump ring onto that ring, You will need to open all rings and then reclose. Remember when you open the jump rings use your tool to pull open side to side, DO NOT: open by pulling each end or you will deform the ring and never get it back to its right shape. [been there and done that, another story] See here for tutorial on jump rings, and hints and techniques here. Note: the last jump ring that holds the pendant will slip onto your ch cord so be sure to put it on the ch cord BEFORE adding your closure.
Now enjoy your necklace!!

You can make this necklace with shiny embroidery thread, crochet cotton silver or gold thread #5, or any crochet cotton thread if you like and use any pendant. I used antique gold findings and Anny Blatt yarn because I had it in my stash.

Have fun and experiment. And remember as always all copyright rules apply.
Always link back to my blog when showcasing your finished necklace and let me know, so I can come see too. I love to see.

Note: This patterns is exclusive of PBDesigns Patterns. If you make these ""Swimming with the Dolpins" be sure to send me your link and link back to this pattern/blog. I love to see photos too. This pattern is copyrighted it can be made for personal use or charity use, or to sell, as long as you give credit to this blog and "PBDesigns". If you want to post photos of these "Swimming with the Dolpins" on your blog or URL, then refer back here with a link for the pattern. Do not post the pattern or copy and distribute to others, or sell it, you are welcome to link back here and print it out for your own personal use.  
 © 2010 PBDesigns
 Thank you. PBDesigns


Related Posts Plugin for WordPress, Blogger...